How to Install Coilovers
If you’ve just bought a new coilover kit and are eager to get them on your car, you are in the right place. In this post I’m going to explain how to install coilovers on your car by yourself.
Can You Install Coilovers Yourself?
Yes! You can install coilovers yourself. Installing coilovers is actually not that difficult and can usually done with most basic tools. If you’ve had experience working on cars, or you want to learn, this job won’t be too difficult and is a good entry into mechanical work.
How Long Does It Take to Install Coilovers
A full coilover install typically takes 2-4 hours for someone who has done it before. If this is your first time, set aside a full day or a weekend, so you don’t have to rush and can make sure you’ve done everything correctly. You might also need to run to the store to get some parts, so do it on days auto parts stores are open if possible.
How Hard Is It to Install Coilovers?
It is not very hard to install coilovers. On a scale of 1-10 of all mechanical jobs, installing coilovers is about a 2 or 3. It is a perfect job for people who want to learn to work on cars.
Tools You Will Need to Install Coilovers
You can usually get this job done with a basic set of tools and a jack and two axle stands. It wouldn’t be a bad idea to borrow an impact socket if you can, as well as a set of spring compressors if you intend on reusing your old strut mounts (more on that below). Here is a full list of tools you will need:
- Socket set with sockets ranging from 10mm to 22mm depending on the car. Most cars use either 12 or 13mm for the upper strut mounts, 17 or 19mm for the upper shock nut and 17 or 19mm for the lower shock bolts. You may also need other sizes for brake hose brackets, sway bar links etc, or if your car uses odd sizes
- A full set of spanners – doesn’t hurt to have in case you need them
- Jack and two axle stands (or four if you want to do all the suspension at once)
- Wheel brace or whatever you use to take your wheels off
- Breaker bar (not necessary but will help undo tight/rusty bolts and prevent you from breaking your ratchet). If you don’t have one you can use a long bit of pipe.
- PB Blaster, WD40 etc if you live in an area where the cars rust
- Impact socket (not necessary but makes life a lot easier)
- Spring compressors (will only need them if disassembling your old suspension to get the strut mounts, bump stops etc)
A Couple of Notes About Installing Coilovers Before We Begin
If you got a coilover kit that didn’t come with top mounts (a lot of cheaper kits are like this) you will need to either reuse the factory top mounts or get a new set of OEM ones. It’s always a good idea to get new strut mounts since the old ones are probably worn. However, if you are planning on using the old ones, then you are almost certainly going to need spring compressors in order to get them off the old suspension.
You can get them at most auto parts stores for not much money, and some even hire them out. But make sure you get some if you are going to reuse the old strut mounts, because you’re going to have a hard time getting them off otherwise.
DO NOT ATTEMPT TO DISASSEMBLE THE OLD SHOCKS WITHOUT SPRING COMPRESSORS.
The factory springs are under tension and are longer than the shock shaft. If you undo them, parts are going to go flying at a rapid rate as the springs release, which is not only seriously dangerous to your face, it will cause damage to your car and anything else it hits.
An impact socket can also come in handy for undoing the old strut mount nut (if your car has the strut mounts with only one nut in the middle, or you are disassembling it), so if you can get your hands on one (you’ll need an air compressor as well unless you get an electric one) it will make your life a lot easier.
DON’T USE THE IMPACT SOCKET TO DO UP THE NEW COILOVERS!
If you use the impact socket to do them up, firstly you’ll probably do it up too tight which can cause premature wear on bushes, bearings and joints, and second, you risk spinning the shock shaft which can wear out the shock internals and cause your shocks to fail.
Just tighten it up by hand using a 3/8ths or 1/2inch socket to the recommended torque settings (if you don’t have the torque settings then just do them up tight, but don’t strain yourself. That’s how you’ll know it’s in the right ballpark). Trust me, if the shock nut comes loose, you’ll know about it long before it falls off, as the shocks will start knocking.
The Coilover Installation Procedure
Preparation
Loosen the Strut Mounts
If you have the strut mounts with only the one nut in the middle, it’s a good idea to crack it loose while the car is on the ground. Usually it’s much easier to do it now than when the car is in the air, as it tends to spin.
Grab your impact socket if you have one, otherwise use your regular socket and try to loosen the nut. If undoing it by hand, try to give it a sharp jolt to try and shock (pun intended) the nut loose without spinning the shaft.
If the shaft spins and you can’t undo the nut, you will have to find a way to hold the shaft in place while you undo the nut. Most shocks will have a hex shape hole in the middle you can use an Allen key on, so you’ll need to use than and a deep neck socket to undo the nut while you hold the shock shaft in place.
NOTE: Don’t take this nut off, just crack it loose. You need it to hold your suspension together.
Coilover Spring Pre-load & Height Settings
Make sure you set the height on all the coilovers to be the same. Measure the threads from the bottom of the lower spring adjuster to either the bottom of the threads, or to the shock body adjuster right at the bottom (if there is one). That will give you fixed points to work with.
Most coilover companies will give you the recommended ride height, so it’s a good idea to start there unless you know what you are doing and want to go straight to that. Otherwise setting them to the middle of their range will be a good middle ground, and you can adjust from there once you see how the car sits.
If your coilovers have the ability to adjust spring pre-load (the height adjustment is done at the shock body), you’ll want to make sure you have that set right before you put them in. Most brands ship their coilovers pre-loaded from factory, but you’ll want to make sure this is the case with yours.
Check the manufacturer’s instructions to see what the correct settings are, and if yours aren’t set, make sure you set them. If there are no instructions, set the pre-load up by winding up the adjustment collars towards the spring until the spring is no longer loose and can’t be turned in place by hand. This will be the minimum pre-load setting for your coilovers.
Accessing the Upper Strut Mounts
On some cars you will need to remove some trim or interior panels to access the upper strut mounts, particularly on the rears. Make sure you remove anything that’s in the way so that you can do what you need to do to get the suspension in and out.
Removing the Old Suspension
- Crack the strut mount nuts loose on the shocks you will be removing. Don’t take the nuts off, just get them loose to make this easier a bit later. The car will either have one nut in the center with a rubber mount around it, or it will have 2-3 nuts around the outside of the strut mount hole. If your car has the latter, loosen those 2-3 nuts, not the centre one.
- Jack up the car and take the wheels off. You can either do the fronts together, the rears together or the whole car at once. However, you can’t really do only one at a time, since the suspension won’t drop enough to get the shock out with the other side wheel on the ground.
- Once the wheels are off, you will be able to access the suspension. Remove any sway bar links or steering joints connected to the shock body (only some cars have this design), and have a look for any brake line brackets or sensor cables that may be attached to the shock body. Make sure to remove those.
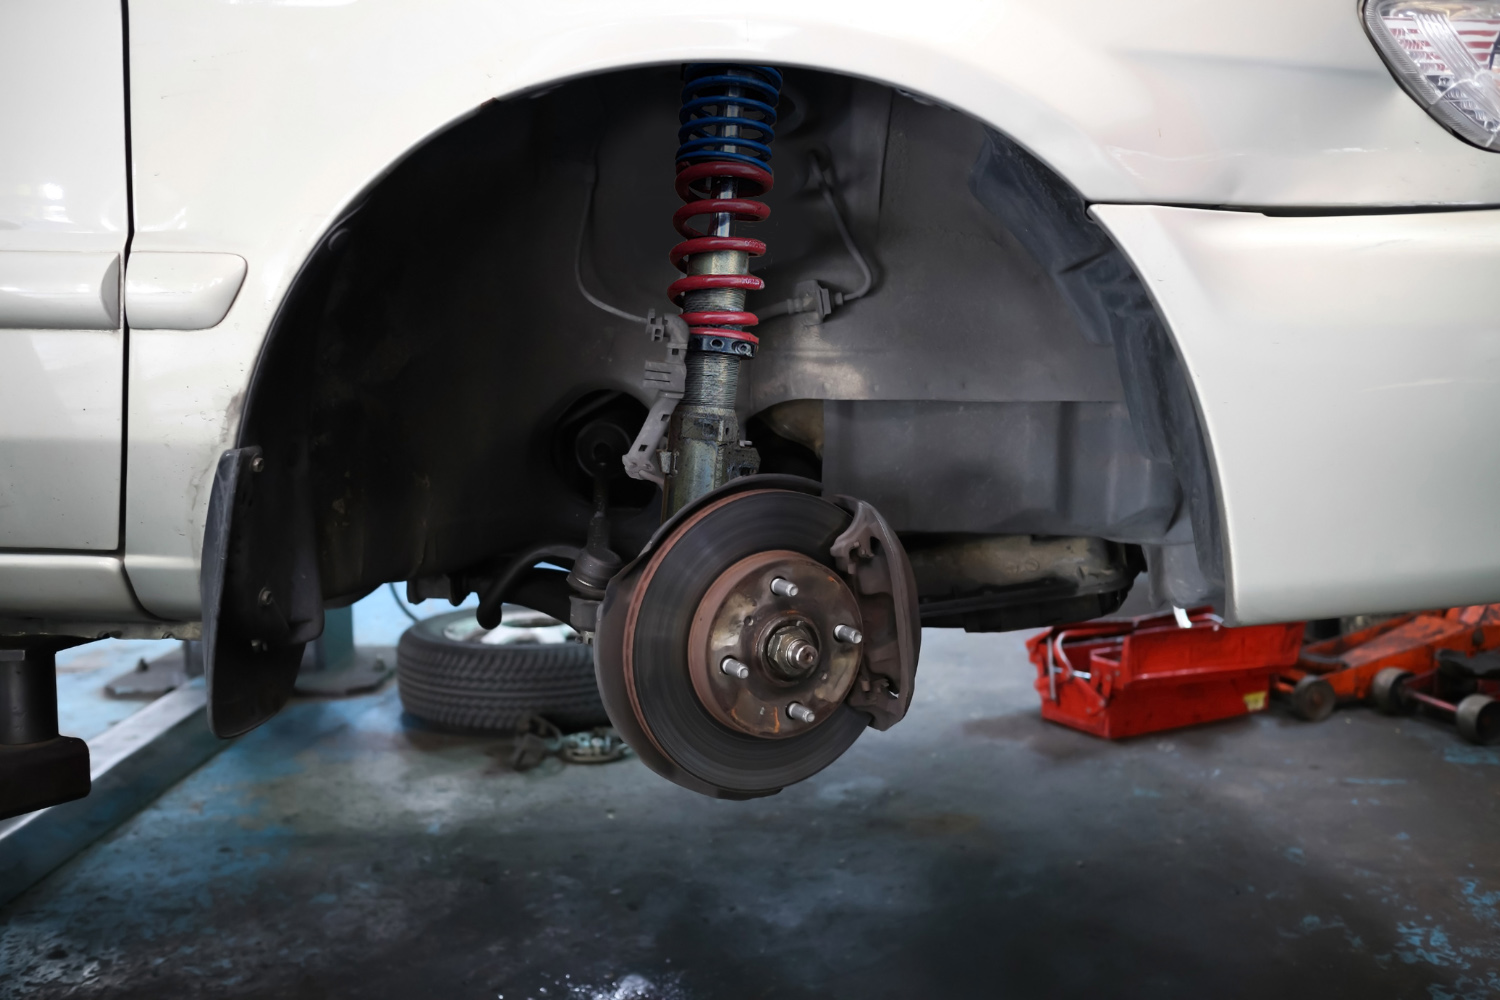
- Now you can begin undoing the shocks. Typically there will be 2 bolts at the bottom of the shock on the fronts, and 1 bolt at the bottom on the rears. Crack these loose, and undo them until they are almost out but still holding the shock up.
- Next you can go back to the upper strut mount nuts you loosened on step 1, and take them off. You’ll probably need to support the shock up to take some of the weight off the nuts in order to remove them. You can either try and hold the shock up while doing this, get a buddy to help or put something under the lower control arm to hold it up. The nuts should come off by hand.
- Once the strut mount nuts are off, you can go back to the shock and remove the lower bolts while holding up the shock’s weight. Once those bolts are out, you’ll be able to lift the shock out of the wheel well. Now your old shocks are out and you can install the new coilovers.
- If your car has separate spring and shock rears, your rear springs should be loose once the shocks are out. You may just need to push down on the control arm to get them out, but they should come out pretty easily.
Disassembling the Old Suspension to Get the Strut Mounts & Assembling the Coilovers
If you are reusing the old strut mounts, you’ll need to read this section. If your coilovers came with new strut mounts or you got new ones, you can <<skip this and go to the next section on installing your coilovers>>.
- Here is where you will need the spring compressors. Put the spring compressors on the springs, make sure they are opposite each other on the spring so that they compress it evenly and that they are on there securely. Do them up until the spring is just loose and able to move around.
- Now you can undo the middle nut on the upper strut mount (the one on the shock shaft). If you cracked it loose earlier, it will be very easy to get off.
- Once the nut is off, you can slide the strut mount off along with the spring and anything else on there. Now you can remove the spring compressors.
- Some coilover kits get you to reuse the bump stops, so if that’s the case with yours, don’t forget to take those as well and put them on the coilover shocks.
- Now you’ll need to install those strut mounts onto the coilovers. Make sure all the parts are correctly in place on the coilover, and then slide the strut mounts onto the shock shaft and do up the nut. You may find that you need to push down on the strut mount in order to get the threaded shaft through the hole to put the nut on. Get a buddy to help you with this, or winding the coilover springs to their lowest setting, as that can help here. Otherwise, use the spring compressors.
- Now your coilovers are assembled and ready to be installed.
Installing the Coilovers
Now that your old suspension is out and your coilovers are ready to go in, we can begin. The installation process is just the reverse of what we just did.
NOTE: Make sure to check if your coilovers have a specific left and right (usually due to the strut mounts, especially if they have camber adjustment) and make sure they are facing the right way, otherwise you’re going to have some very odd adjustment ranges. The strut mounts should have a marking on them telling you which way they go.
- Get the coilover you are installing and hold it in place, lining up the bottom bolt hole so you can pass one of the bolts through to hold it in place. If there is a second bolt, put that through as well and do them up most of the way, but don’t tighten them yet!
- Now position the upper strut mount in place and lift the coilover up to get the studs through the holes in the strut tower so you can do up the nuts. You can use a jack under the control arm to make this easier. Wind the nuts on by hand, but again, don’t do them up yet!
- Now, most cars will have at least some adjustment for camber at the bottom bolts, so you need to pay attention to where the shock is sitting before you do the bolts up. You won’t get it perfect, but you want it close enough until you go for an alignment. Try and see if there is an impression/marking of the old shock, as that will probably give you the best reference point. Otherwise just try and get it close to the middle as possible. Do those bolts up tight (see torque specs if you want to be precise, but I usually just do them up TIGHT.)
- Now you can attach any other bits that need to go on like brake line brackets, sway bar links etc. Get those all done up.
NOTE: Don’t fully tighten the sway bar links until the car is on the ground, you want to let it settle first. The only exception to this is if you can’t reach them when the car is on the ground, then you have no choice. - Once you are sure everything is done up, you can put the wheels back on and lower the car back on the ground. Drop the handbrake and let the car roll a bit to settle, and now you can do up the strut mount nuts. Again, do these up to the specific torque spec, or just do them up fairly tight but don’t go overboard, they don’t need to be too tight.
Now you should be good to go. Do the other two coilovers if you haven’t already, and go for a test drive. You may hear the occasional small noise as the suspension settles and breaks in, but you shouldn’t hear any serious clunking or knocking. If you do, it means something is not tight or installed correctly, so go over it all and check again.
Once you have installed the coilovers, as long as the car is not dangerously pulling to one direction, it is advisable to drive for about a week to let it all settle and the springs to drop to their natural height before going for an alignment. If you want to make any ride height changes, now would be the time to do it before the alignment.

Cars owned: Mk2 Golf with 1.8T swap, BMW E28 with M30B35 swap, BMW E36 328I Mtech, BMW 750IL, Nissan 300ZX, Honda Civic EF
- BC Racing BR Series VS Tein Flex Z Coilovers - April 15, 2024
- The Pros and Cons of Shock Body Vs Spring Perch Coilover Height Adjustment - April 13, 2024
- Monotube Vs Twin Tube Shocks: The Ultimate Guide - April 11, 2024