How to Relocate Car Battery to the Trunk
If you are looking to relocate your car’s battery to the trunk, you are in the right place. In this post I’m going to show you exactly how to do it along with all the parts you will need to get right into it.
Parts You Will Need to Relocate the Car Battery
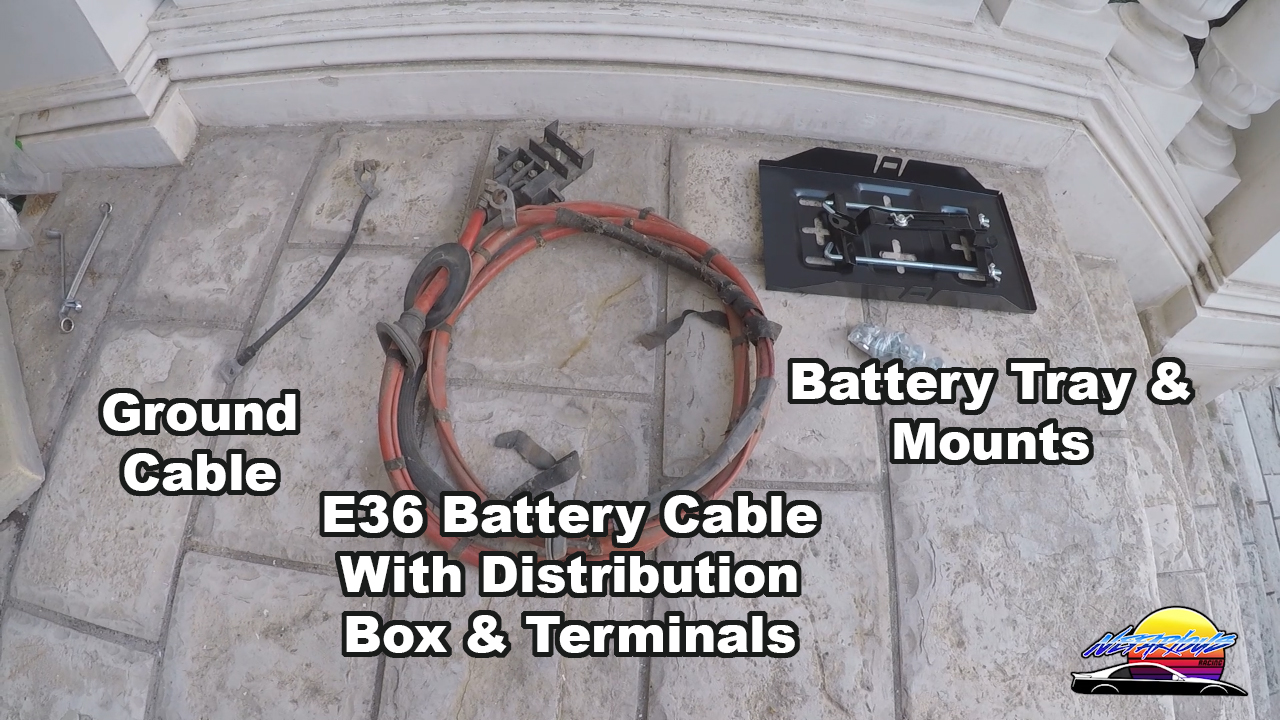
– Battery Cable – I like to use the battery cable from the BMW E36, because they are thick, high quality cables with a distribution block and crimp bits already attached.
If you are going to buy normal cable, you should go with 4 gauge or larger. Personally I would go larger just to be safe, closer to 0 gauge, but it depends how many electronics you intent to run through the cable (for example a sound system would require a much larger cable – or you could connect it straight to the battery to avoid this issue. Just keep all this in mind when deciding which cable to get).
Also make sure you determine where you are going to place the battery so you can measure exactly how much you will need. Most likely it will be 5-6 meters depending on the car.
– Ground Cable – This cable goes from the battery negative terminal and needs to be grounded to the chassis somewhere close to the battery (ideally within 30cm or so). You can also get this from the BMW E36.
If buying normal cable, it can be thinner than the positive, however personally I would just buy an extra meter of whatever cable you are using for the positive and use that. That way you’ll be 100% sure you won’t have any issues.
– Battery Mount / Tray – A way to mount the battery in the trunk. I used a battery tray and tie downs I found on eBay. Don’t forget any bolts you may need for this.
– Crimp Bits – To put on the cables on the engine bay side (and the battery cable if you are just using a normal battery cable)
– Power Distribution Block – If not using the E36 cable, you will need some way to connect the positive battery cable to the positive cables in the engine bay.
How to Relocate the Battery
NOTE: Because every car is different, there is going to be some level of customization and modifying in order to make this work on your car, so keep that in mind.
Before Starting: Disconnect your battery and pull it out
You’re going to need to remove the battery anyway, so disconnect it now and get it out of the way to make your life easier and ensure you don’t short anything out by accident.
Step 1: Find a hole in the firewall to pass the battery cable through
I recommend this as the first step because if you don’t do this first, you may end up doing all the work only to realize there is no way to pass the cable into the engine bay. Now, worst case scenario you could drill a hole, however I realize some people may not be keen to do that.
So, find somewhere you’ll be able to pass the cable through from the engine bay to the cabin. Usually there will be a couple of blank grommets which you’ll be able to use. Just make sure it’s big enough to pass the cable through as well as any terminals on the end of it.
Also, make sure there are no sharp edges anywhere that could wear through the cable. The last thing you want is for the chassis to wear through and touch the wire.
Here is the grommet I found and used on my Honda Civic:
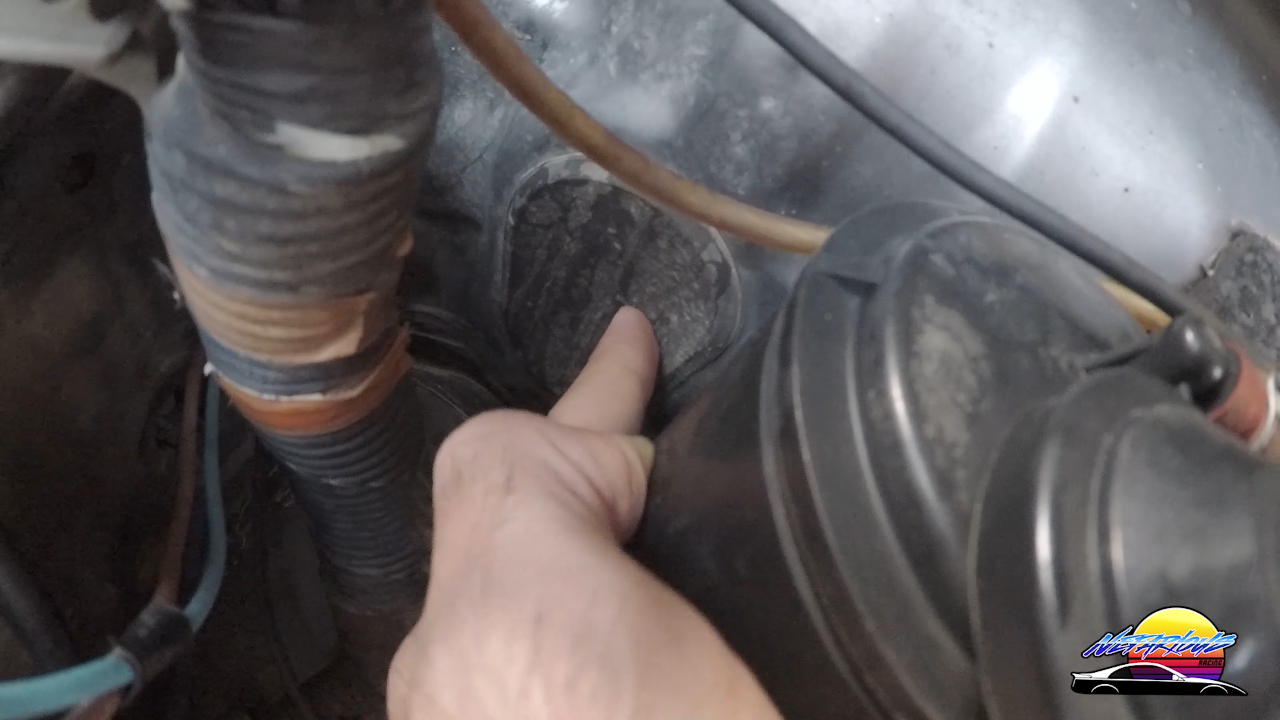
I like to cut a slit in the grommet and run the cable through it, which makes sure the cable is protected from the edges (you’ll do this once you run the cable):
Now that we know where we are going to run the cable, we can move on to step 2.
Step 2: Mount the battery tray or mounting system & the grounding cable
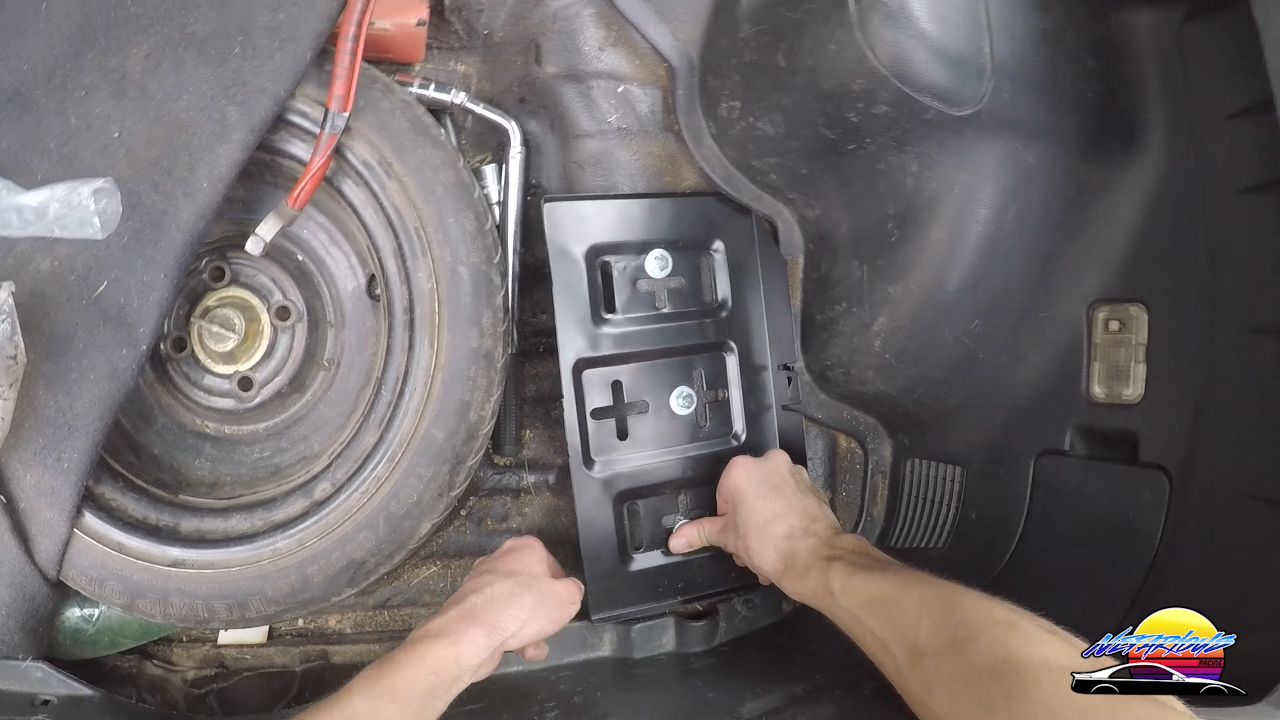
The reason I put this as the second step is this will determine exactly how you run the cable, so you want to be 100% certain that you can in fact mount your battery in your selected spot.
In my case, I used a battery tray with tie downs, and bolted to the floor in the trunk. This meant I had to drill holes in the floor and put nuts and washers underneath.
IMPORTANT: Make sure you can access the underside if you are using nuts and bolts, so that you can actually tighten them!
Rivnuts would also be a good alternative here to eliminate this problem and make installation easier, if you have them.
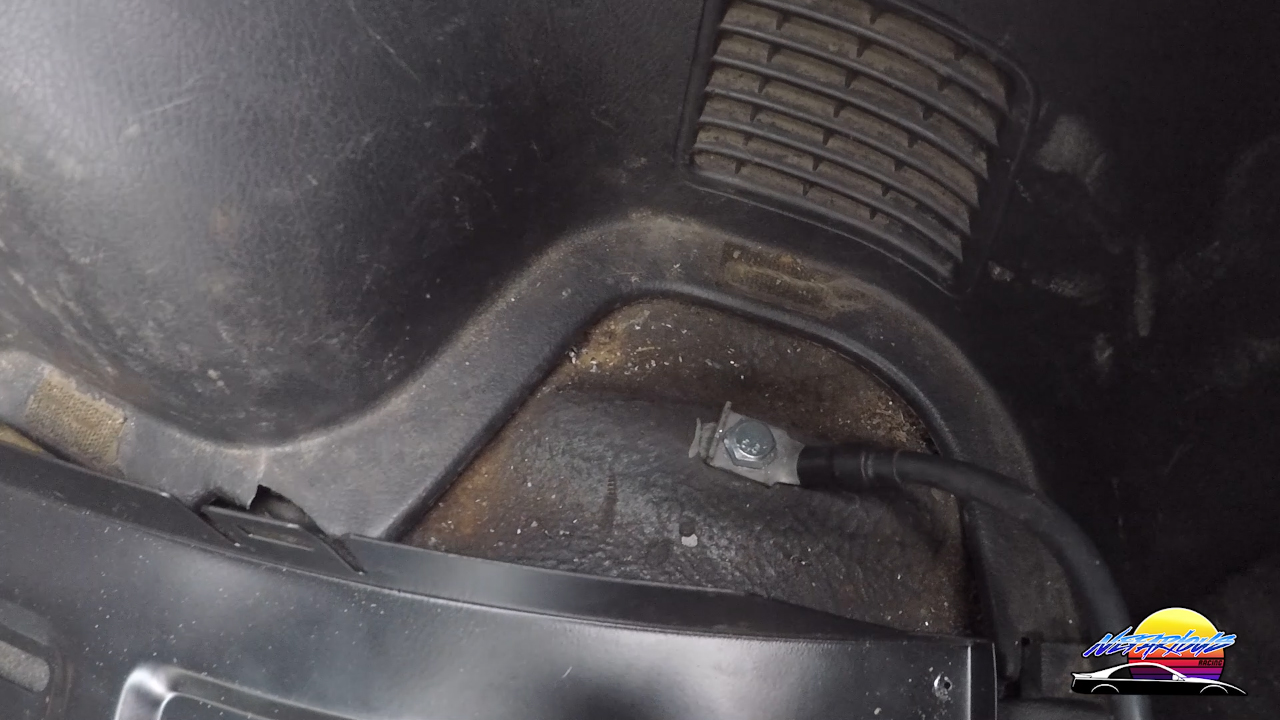
You will also need to find a spot the mount the grounding cable to the chassis. Try and pick a spot with thicker metal, such as a strut tower. However, you can just drill a hole in the trunk floor and bolt it there like I did. Just make sure you sand any paint down so that the ground cable has metal to metal contact.
Step 3: Pass the battery cable through the car

Now you can pass the battery cable through the car.
I find it is easiest to start from the rear, especially if you are using the E36 cable which has the battery terminal crimped on, as that will be a pain to put through small gaps.
You will more than likely have to lift up the rear seat and your carpet in order to run the cable. This is where you will have to figure out what’s best for your particular car, however I haven’t seen a car where you can find some sort of passage for the cable – usually along the side of the car. Have a look at where the factory wiring harness goes, as often this is the best route to take.
Once you’ve got it through, pass it into the engine bay and slide on the grommet mentioned earlier. Now you should have your battery cable in the engine bay and ready to connect.
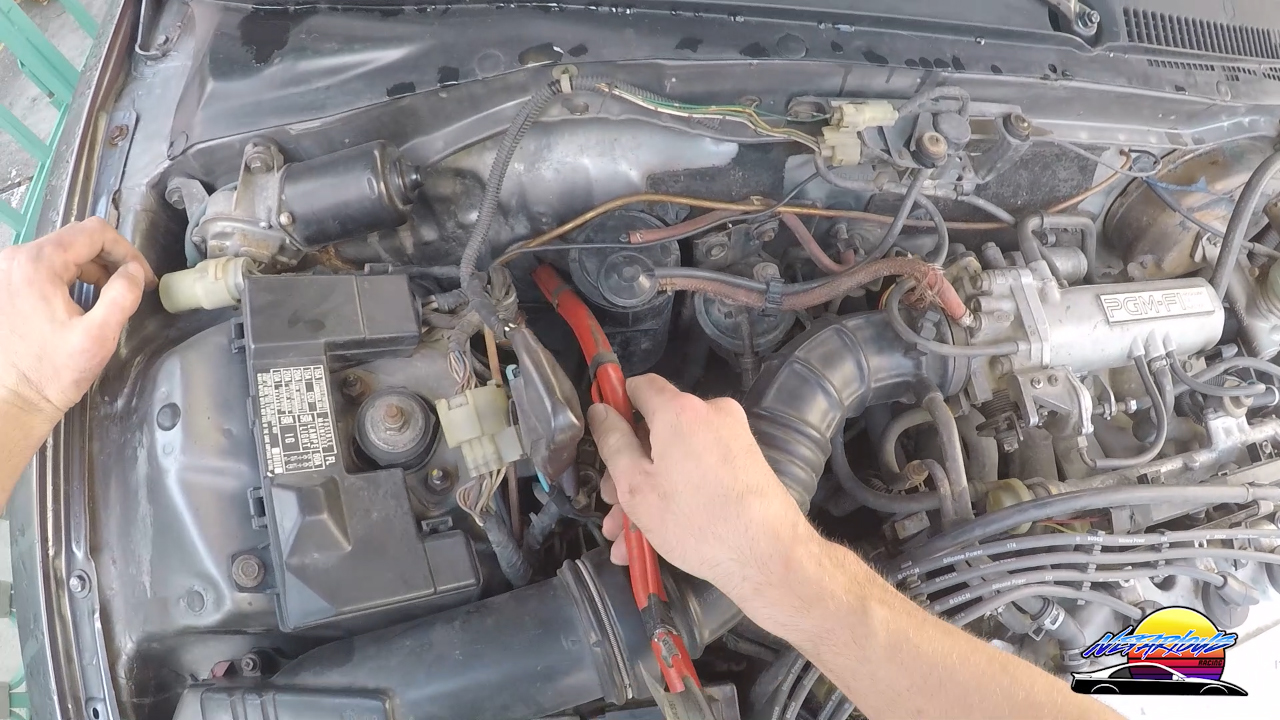
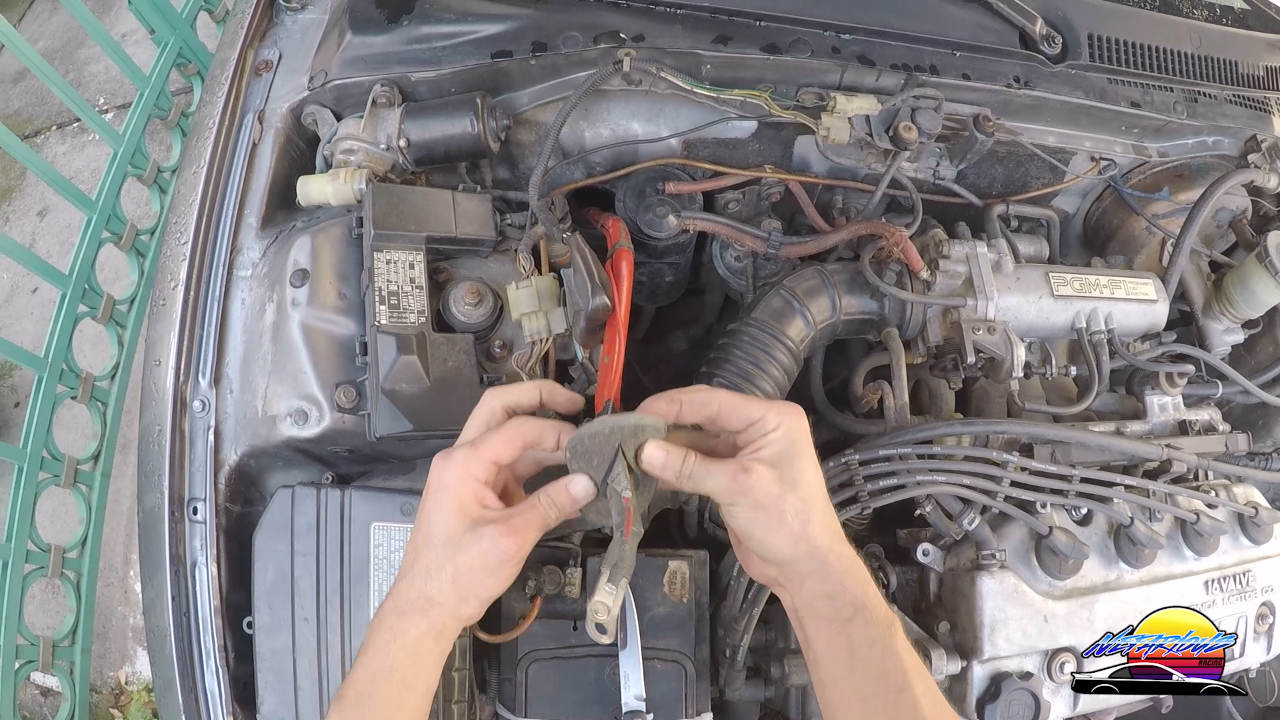
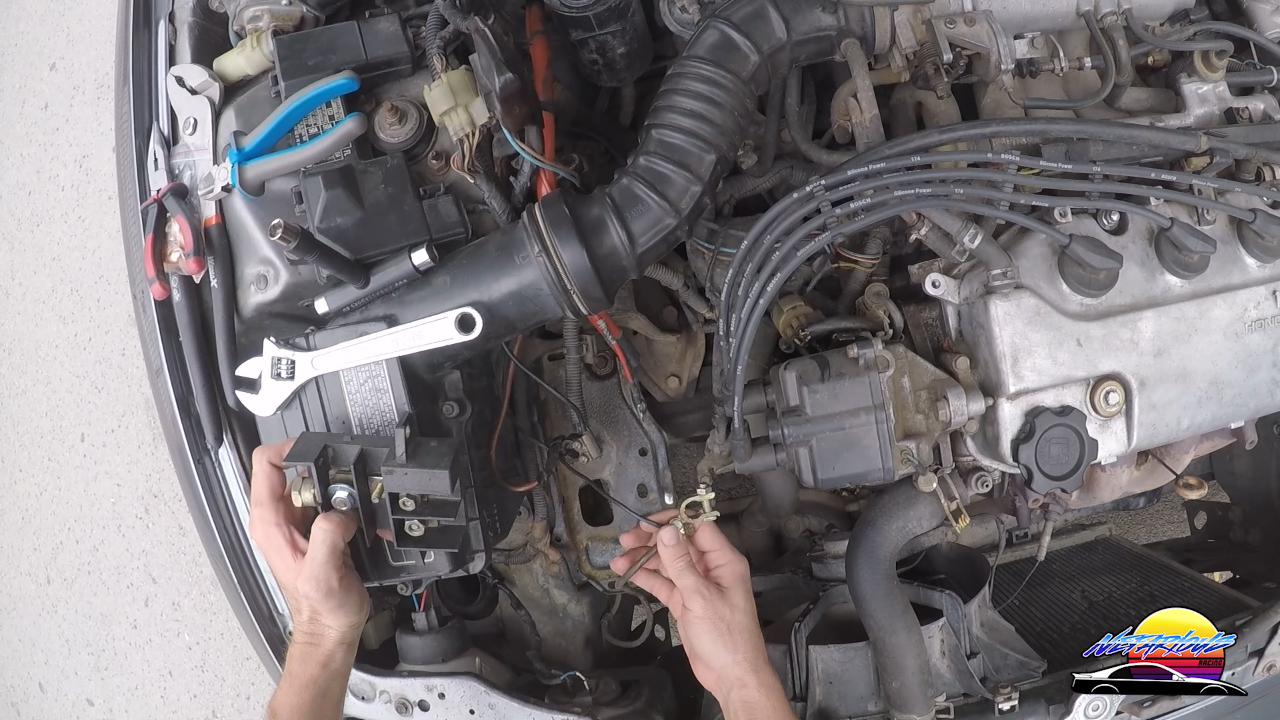
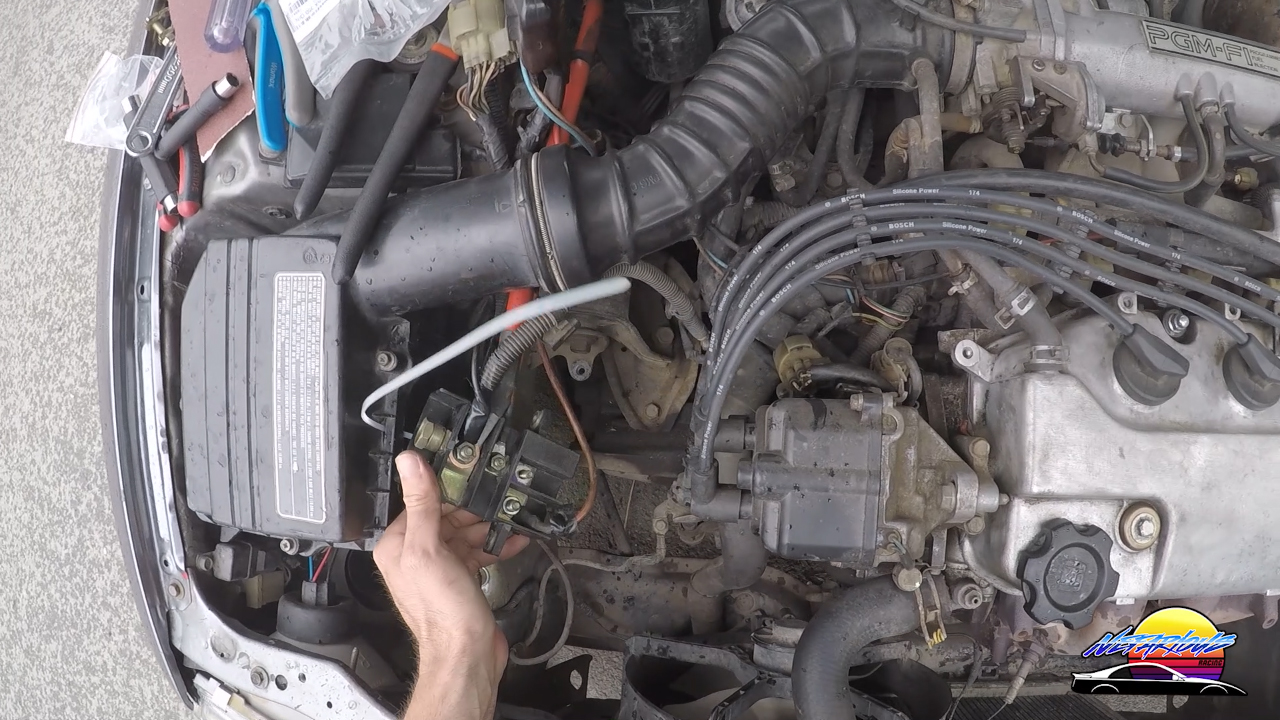
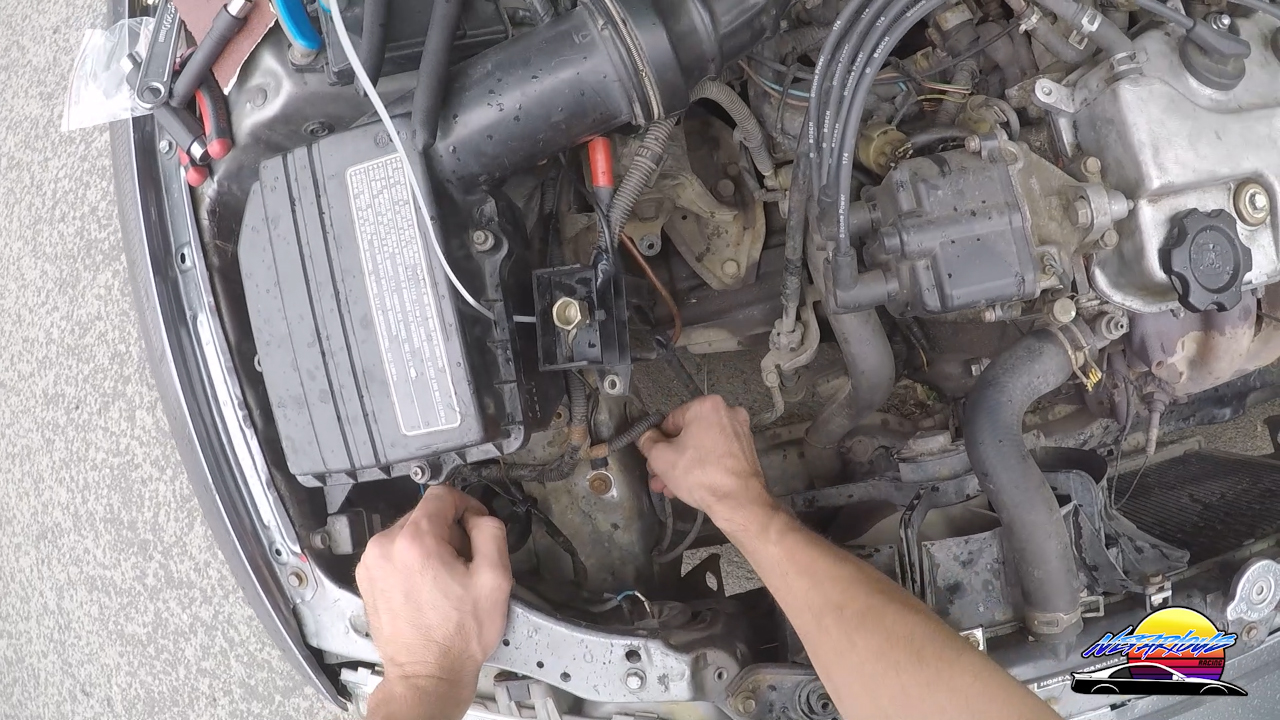
Step 4: Connect the distribution block and engine-to-chassis ground at the engine bay
Now that you’ve got the battery cable in the engine bay, you can connect the positive cables that were connected to the battery terminal to your new cable.
If you got a distribution block, connect your battery cable to the distribution block and then connect the positive cables.
In my case, I had to crimp terminals onto my cables in order to bolt them to the distribution block:
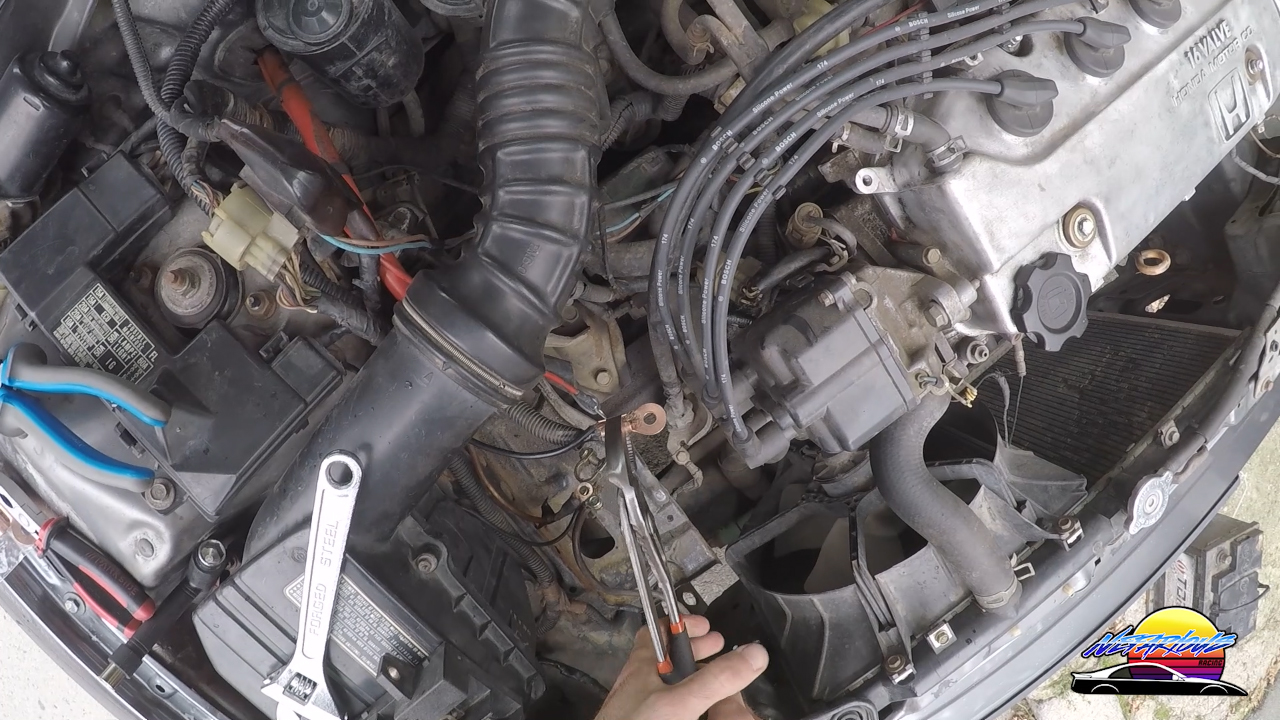
You also want to connect the cable that was going to the ground battery terminal to the chassis. Normally, this cable connects to the motor, in order to ground the motor. Find a spot to ground it to, similar how we did in the trunk, and make sure the connection is sanded down to bare metal and clean:
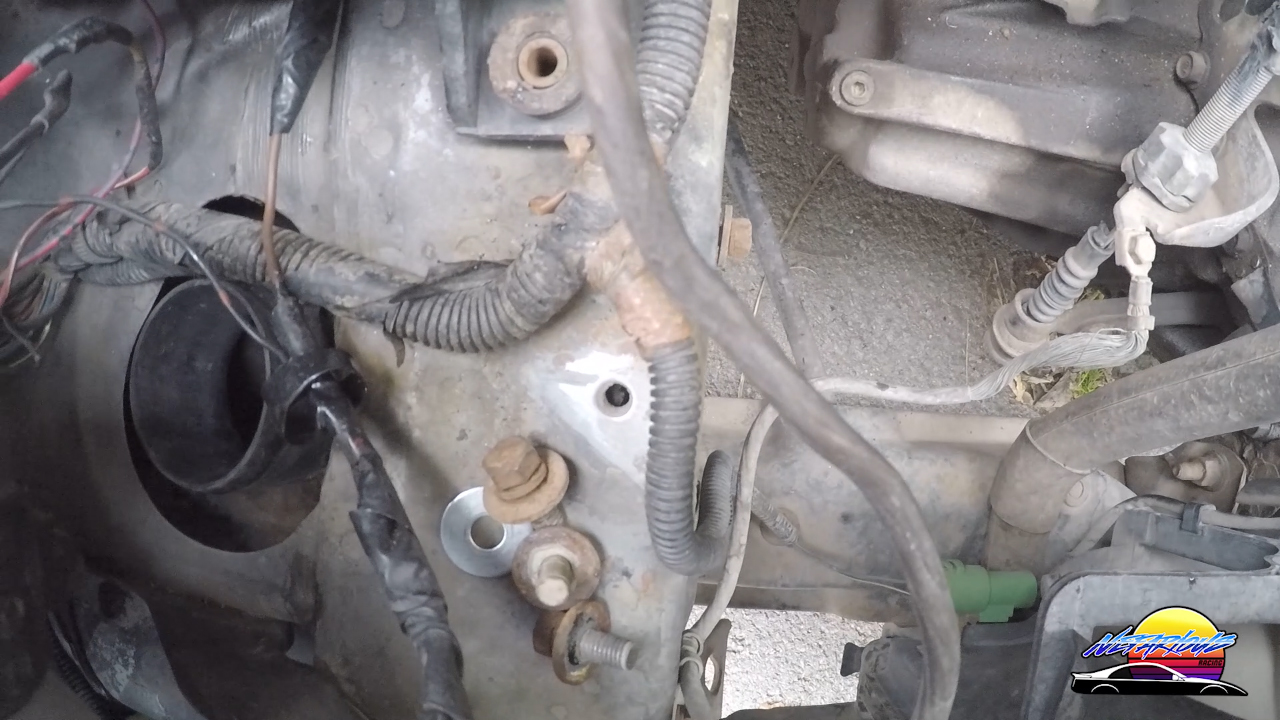
Make sure you bolt it up tight:
And now just make sure that all your positive connections are sealed up and any covers on the distribution block and put on. You don’t want any of these touching either the chassis or the engine, or you could have a fire. So make sure you take care on this step and everything is well insulated.
Now that that’s all done and connected, you can move to the final step.
Step 5: Install the battery in its new place and test it.
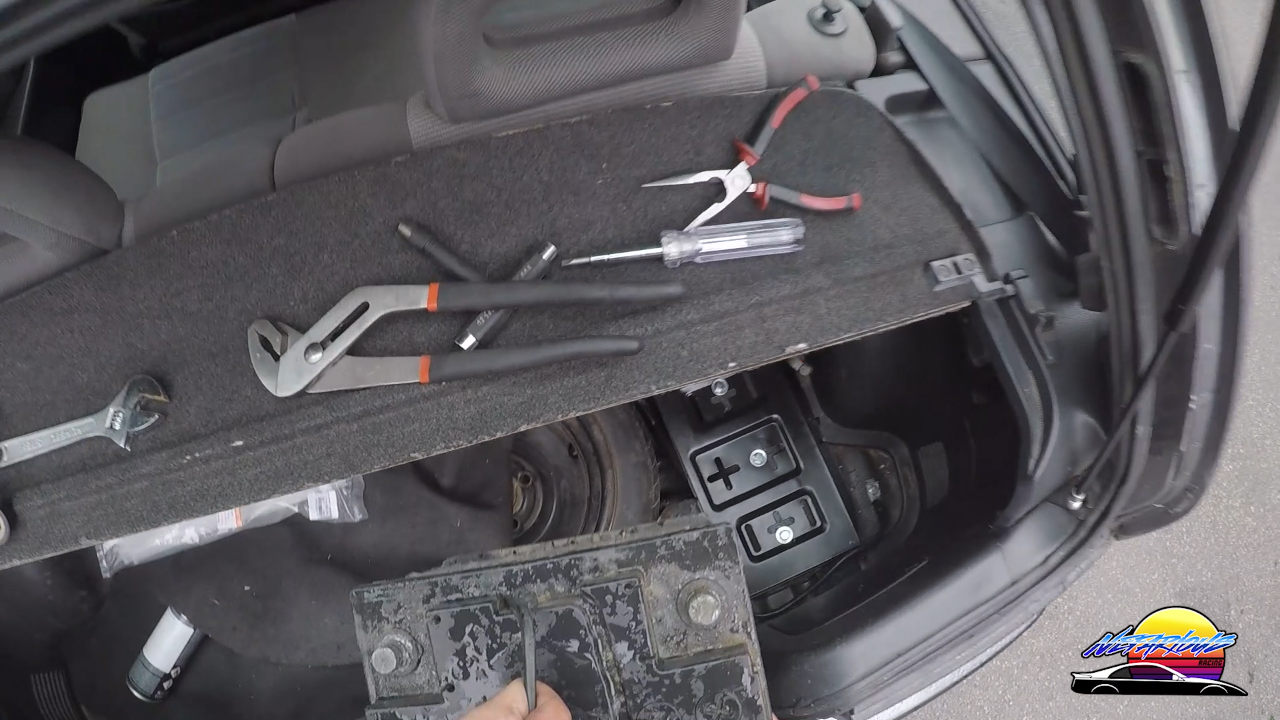
Install your battery in its new location and put the terminals on. It’s a good idea at this point to not do them up but keep them loose, just in case you need to pull them off quickly if something goes wrong. However, make sure you push them on snug.
Now you can go and start the car. Pay attention to if it starts normally or if it struggles. If it starts normally and sounds strong, you’re probably good to go. However I recommend leaving it running for 5-10 minutes just to make sure everything is good. See if any of the cables are getting hot (indicates a poor connection somewhere if they are) or if there are any other issues. If not, congratulations, you’ve successfully completed the job. Just do up the battery terminals and you are good to go.
Troubleshooting Car Battery Relocation Issues
If you do find that the car is struggling to turn on, or some of the cables are getting hot, odds are you have a poor connection somewhere along the line. Turn the car off and disconnect the battery as soon as possible to prevent anything worse happening such as a fire.
You’ll need to go through all of your connections and see where the issue is. The usual culprits are poor grounds and poorly done crimp bits, so check those. Also make sure all connections are clean and free from any rust or paint.
You can also use a multimeter to test resistance between various connections, which can help you if you really can’t figure out where the problem is. But honestly, if you’ve followed the steps above, you shouldn’t have any problems.

Cars owned: Mk2 Golf with 1.8T swap, BMW E28 with M30B35 swap, BMW E36 328I Mtech, BMW 750IL, Nissan 300ZX, Honda Civic EF
- BC Racing BR Series VS Tein Flex Z Coilovers - April 15, 2024
- The Pros and Cons of Shock Body Vs Spring Perch Coilover Height Adjustment - April 13, 2024
- Monotube Vs Twin Tube Shocks: The Ultimate Guide - April 11, 2024